Additives Often
Used in Sausage Making:
|
|
General Tips and Suggestions |
|
Home Introduction Making Salami Formulations Resources Production Photos Tips |
Copyright © All rights reserved
To find out more information about any
of these topics, just click on the topic.
|
2001-2018 Len Poli - Sonoma Mountain Sausage |
Additives Often
Used in Sausage Making:
|
|
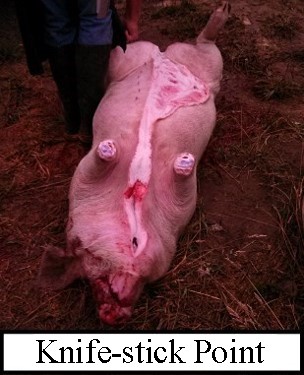
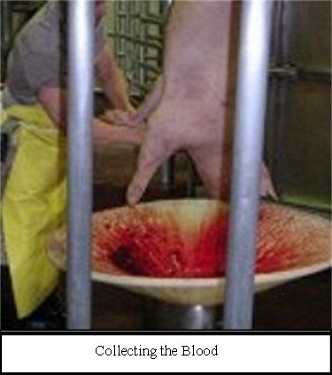
Preparing Pork Blood for Blood Sausage
I have used the following techniques for preparing freshly collected
during slaughter. Stun the animal with a gunshot to the head prior to
sticking (killing) it...you need a .22 caliber or larger
pistol or rifle; the animal will
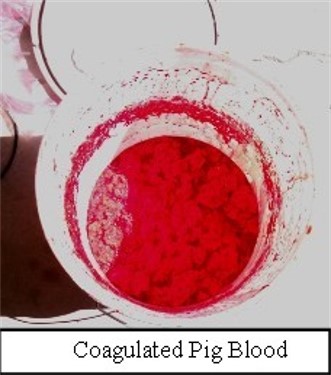
sink to its knees. Wash and sterilize a food grade plastic pail or bucket. The hog is hung upside down over the blood bucket and one quick incision is made to bleed the hog. The slaughtered pig is hung so that you can easily cut into the carotid artery-(main blood vessel leading to the head). Wash the area of the neck, then stick the pig after determining the location of the tip of the animal's breastbone in the throat area. Make a 2- to 4-inch incision from that point forward along the exact center of the neck. Use a smooth motion to insert an 8 to 10 inch very sharp knife into the incision and cut at a 45o angle down and back to a point about 6 inches below the top of the sternum, and twist slightly. Be careful not to cut too far back into the body because the knife blade could puncture the chest cavity and cause internal bleeding. At this point, it is advisable to find a picture with a diagram as to where the right place is, because a picture is worth a thousand words. Check out USDA Farmers Bulletin 2265. When you insert the knife into the throat area, have the pail ready-collect the blood. If you do not get a very copious blood flow immediately, do it again quickly, with the full length of the knife. Immediately upon draining the blood from the pig, stir it rapidly with as stick to aerate it. (You will see the fibrin in the blood begin to precipitate). remove the precipitate by filtering the blood in the pail through cheese cloth. Add 1 tablespoon of vinegar and ½ teaspoon of salt. Note alternately, you may dissolve a tablespoon of tri-sodium citrate to about a cup of water and use that instead of the vinegar. This helps preserve the blood. You now have stable blood that will not clot and will keep in your fridge for about a week in edible form. If you don't do this, you will have a solid block of blood jelled blood which has much more limited culinary use.
|
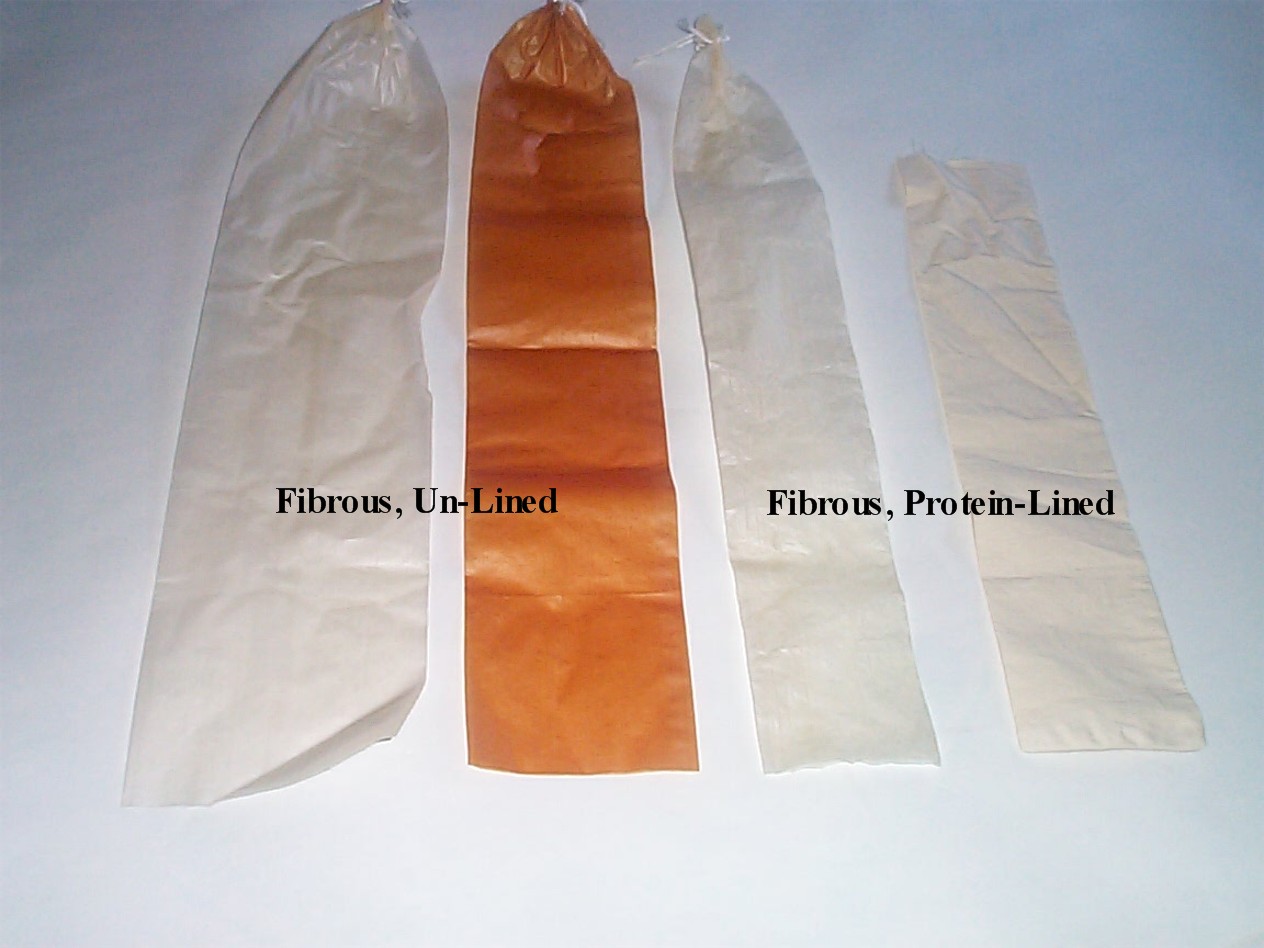
Casings Natural: Natural casings are made from the intestines or "innards" of a variety of animals. In the U.S. they are generally made from the internal organs of hogs, beef, or sheep. In other countries casings from other animals like horses, donkeys, goats, geese and ducks are available. Depending upon the casing and how it is used it may often be considered edible; others are not. Casings generally come from the supplier packed in salt or a a preserving brine. The can be kept under refrigeration almost indefinitely. Any odor that they have will be gone once they are properly prepared. All natural casings must be rinsed and soaked in several changes of fresh water before they can be used. Some require additional preparation. The casings are generally measure by their diameter in millimeters--an inch equals 25.4 millimeters (mm). Below I've listed some of the more commonly used casings.Sometimes the casing type is suggested in my formulation; other times, you'll have to experiment with what you prefer. (For an enlarged view, click on the photo.)
Casings, Artificial: There are a wide variety of artificial casings available on the web for the adventurous to seek out. I have listed below several types that I use most frequently. In selecting a casing you have to consider if you want it to be edible (yes, some artificial casings are edible). The edible casings are very thin and will not support the weight of the sausage in the smoker.
|
|
|
Emulsion Notes:
NOTE A MORE EXTENSIVE DISCUSSION OF THIS TOPIC CAN BE FOUND ON THE
INTRODUCTION PAGE.
Emulsions are sausages where the meat is ground so finely that it
encapsulates the fat to form a smooth Lean muscle fiber has a high myosin content. Myosin is the tem used to represent all salt soluble, water soluble and heat-coagulable proteins in the fibers. Emulsions are formed by solubilizing the meat protein and suspending the fat globules in the protein solution that contains both soluble proteins and collagen from the fiber's connective tissues. A food-processor in the home sausage kitchen can do a fairly good job of forming an emulsion if a few precautions are taken. The result will not be exactly like the one produced by commercial cutters and emulsifiers, but a decent home product can be made. Using a large bowl processor, remember to work in small batches, about 1 1/2 lbs to 2 pounds of paste maximum. During the emulsification process, considerable heat is generated. This will cause the emulsion to "break" by causing the proteins to coagulate preventing them to "grab-hold" of the fat globules. Ice or ice-cold water is added periodically to absorb the generated heat and ensure that the emulsion holds. Experiment with your equipment, but I find that if I process the lean meats first and then add the fats to form the emulsion, I get better results.
Paste Temperature: I use a Cuisenart food processor. Generally I divide the spices meat into one and a half pound batches and process each batch for 2 minutes, pulsing often to ensure even emulsification. I also add ice cold liquid (mostly water) a little at a time to keep the temperature below 60oF (15oC). Try to keep total liquid to less that 10%. Cooking Temperature: Hint: Place the product in 120oF (49oC) poaching liquid and gradually raise the temperature to 175oF (79oC). Gelatin can form from meat collagen during the cooking process and I found that if the poaching liquid temperature raises too rapidly or gets above 180oF (82oC), the gelatin often breaks from the emulsion and creates pockets and pools of gelatin (and or fat) dispersed in the emulsion. Casings for emulsion-type saysages: I've had the best luck with moisture-proof plastic, fibrous or coated casings for emulsion sausages that are poached. I've used natural casings also; but, they often wrinkle after cooking and showering. I've found that dipping the sausage in boiling water a few seconds, shrinks the casing and remove most of the wrinkles.
|
Ham Press - 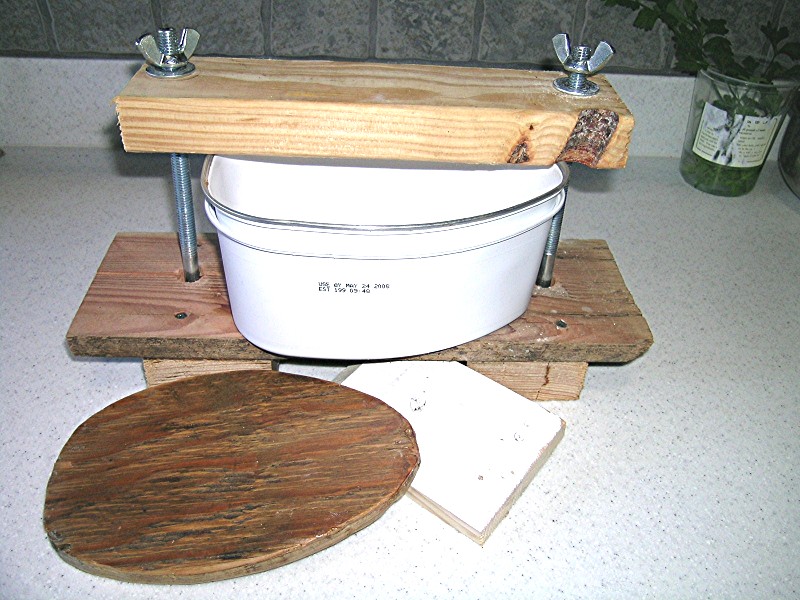 An inexpensive mold can be made out of scrap lumber and two threaded carriage bolt with wing nuts. you can put something like the one show in the photo (right). To mold the ham to the shape that I wanted, I used two plastic ham "cans"; using two allows for more strength when pressure is applied. Arrange the meat, skin side down and place pieces so that the loaf is level and even. cover with a tight fitting lid (cut out with a band saw or jig-saw) over the meat and apply pressure according to the directions given in the formulation. If you're of the inclination to have something more substantial, the press can be made out of Lexan or plastic blocks and stainless steel bolts.
|
|
Humidity
Control: If you are not lucky enough to
live in an area where the humidity is easily controlled, then you might want
to consider a humidifier and humidistat. A humidifier is a device that can
add moisture to the air and for sausage making purposes a baby nursery
"cool-air" humidifier will work fine. A humidistat is a device that senses
the humidity in the environment. The device should have a control to set
humidity in a range between at least 40% to 80%. These devices
available in a number of price ranges from several vendors.
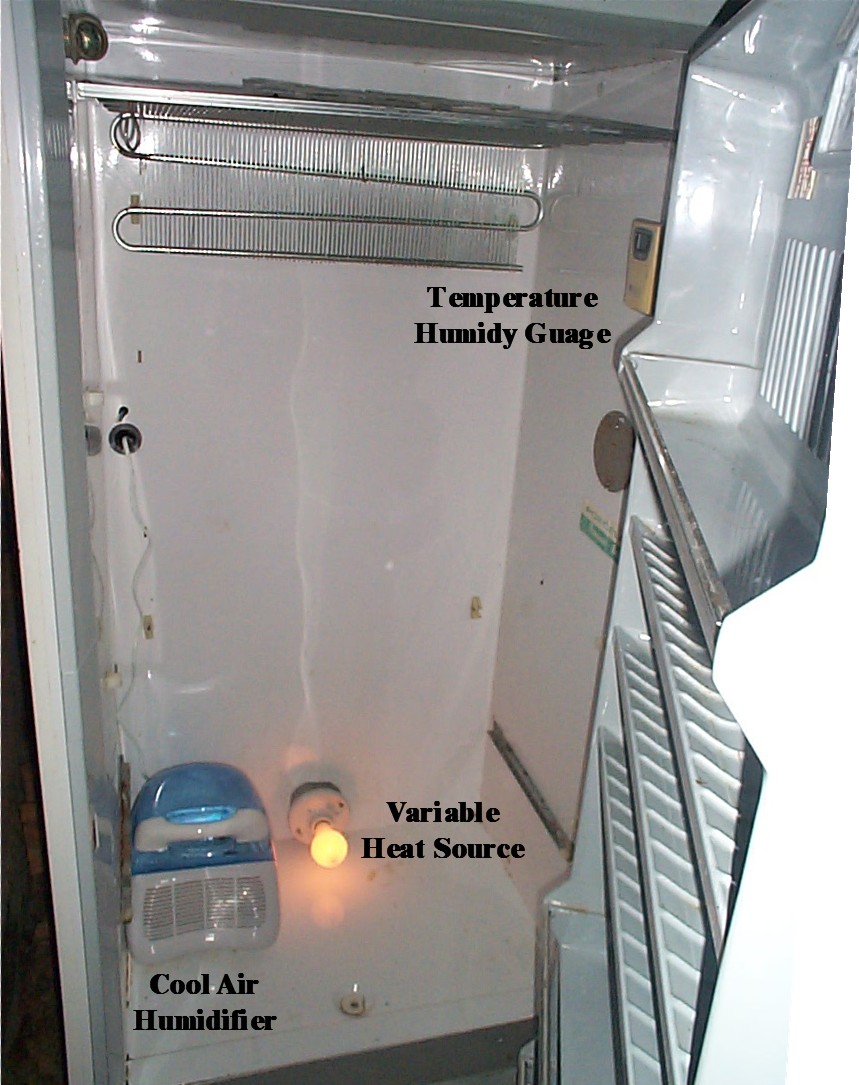
A sausage making buddy has a great solution to both humidity and temperature control by modifying a home-refrigerator by altering the temperature and humidity controls. You can read and see his elegant solution by clicking here: Creating An Ideal Environment For Dry Curing Sausage.
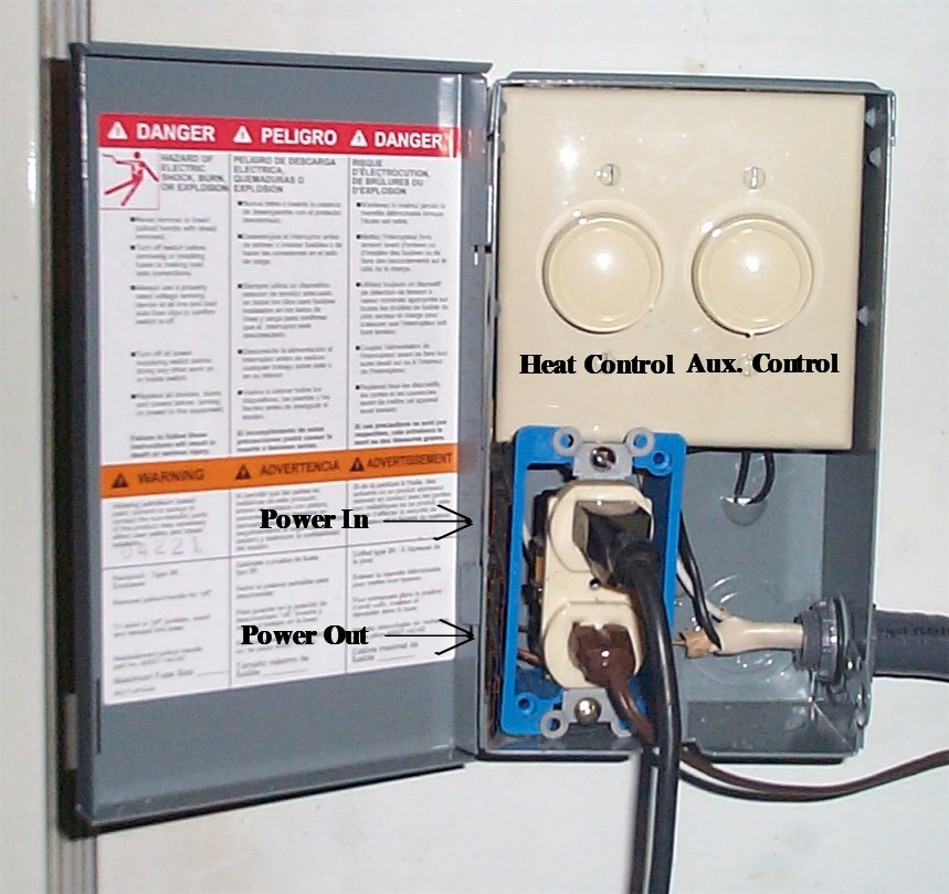
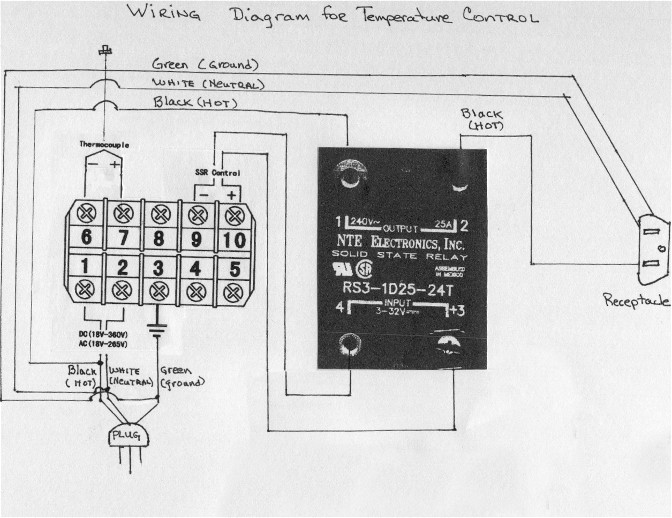
Controlling the Temperature in a Salami Incubator - A More Elegant Approach Constructing a P.I.D. Intelligent Temperature Controller
P.I.D. controller - Non-technical
operational definition:
A PID controller is an electronic device that can be used to regulate the temperature of an incubator. The device senses temperature input from a thermocouple and regulates temperature output (heater in this case) to maintain the user's pre-set temperature. The PID controller uses a built-in automatic logic algorithm to learn the parameters set up by you to regulate the system. For example, if you desire the temperature inside your incubator to be maintained at 88oF, set up the controller to recognize when that temperature is reached, press a single button and the built-in artificial intelligence circuit is activated to automatically calculate and set all parameters for the temperature set by you. It will maintain that temperature within 0.2% accuracy. P = Proportional Band. The constantly calculated "P" value controls the output of the temperature device (heater). When the "P" value increases, the temperature device will off; when the "P" value decreases, the temperature device is turned on. This will occur automatically to maintain the internal temperature you set in the incubator. I = Integration Time. This constantly calculated value reduces error. When the "I" value decreases, response speed is faster but less stable; when the "I" value increases the response speed is slower but more stable. This is done automatically. D = Differentiation Time. This value constantly controls the advance and compensates for the delay in order to maintain system stability. With a little knowledge of electronics, you can construct such a control unit for your incubator. Many of the materials are available at any well stocked computer-supply store or eBay. You can build the controller for about $70.00 USD or less. Materials Needed:
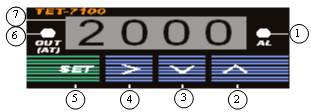
Setting the PID Controller
1 -- AL, Relay J1 Indicator light.
Interior wiring - see diagram below PID Controller - Relay - Thermocouple
Temperature and Alarm Parameter Setting: To enter temperature and alarm parameter setting mode press (SET), then enter code "0001", press (SET) again.
During Normal Operation mode, pressing (^) or (v), the display would show SV. Press (^) or (v) again increase or decrease SV by 1 degree.
P, I and D Parameter Setting:
a) To enter initialization parameter setting mode press (SET), then enter code "0089", press (SET) again. b) To enter PID parameter setting mode press (SET), and then enter code "0036", press (SET) again.
|
|||||||||||||||||||||||||||||||||||||||||||||||||||||||||||||||
|
Grinder Tips: When grinding fats, make sure that it has been cut in small enough sizes to fit the grinder throat then partially freeze the fat. Also, place the grinder tube and worm, knife and plate in freezer prior to grinding the fats. This will chill the grinder tube, cutting knife and grinder plate, minimizing smearing of the fat. If you get dings on the grinder knife or it becomes dull, you can sharpen it by putting a piece of 400 grit wet-dry sandpaper on a thick glass plate and "sanding" the blade by running it back and forth over the paper. After washing the steel
plates and knives, warm them gently in the oven to dry them out. Spray with
a food grade lubricant over each item and wrap in brown paper cut from a bag
for storage. The grinder on the right works fine for people that only make small batches of sausage, or you are working on a test batch to perfect the seasoning blend. It's an all-purpose grinder that is easy to set up and clean . It comes with plates and a sausage stuffing tube. This grinder has made many a batch of sausages; it is the Model 113 made by Moulinex. It is a great grinder for the beginning sausage maker and its relatively inexpensive. There are a number of similar brands available on the market. With these lower powered grinders, its important to have the meats to be ground almost at the freezing point so that you get a nice clean cut.....otherwise the grinder plate clogs up with sinew and the meat comes out like mush! The grinder to the left is a # 22 size plate and I have a variety of plate sizes and has a reversing switch. It is supplied with only two grinding plates, however. Extra grinding plates are available on-line from many suppliers or in at the Hobart store in your community. This particular model was made for Cabella's by the Italian firm, Tre-Spade and has a 3/4 hp motor. If you hunt and have meat to be ground or you make a lot of sausage, then your should consider a grinder of this size. The next size up would be a #32, generally with a 1+ horsepower motor and the meat "flies" through that one! There are a number of good grinders for sale...don't buy the first you see! Do your homework
|
|
BACTERIAL AND MOLD STARTER CULTURES
NOTE A MORE EXTENSIVE DISCUSSION OF THIS TOPIC CAN BE FOUND ON THE
INTRODUCTION PAGE.
One can not always depend on indigenous bacterial contaminants to produce a desireable result. Specialized meat cultures can be added to impart added safety, color and taste to dry-cured or fermented sausages. Fermentation is best controlled by the addition of selected strains of Lactic Acid bacteria (a large family of bacteria), whereas members of the Staphylococci contribute to the color, aroma, flavor and stability of the sausage. Also available are cultures that produce bacteriocins that provide anti-lysterial effects and bioprotection from pathogens. Lactic Acid Starter: Starter cultures accelerate the formation of lactic acid and drop the pH (to about pH5.3) of salami, which can inhibit the growth of spoilage bacteria and pathogens. The rapid decline of pH not only gives the salami a unique lactic acid flavor, but also increases the firmness of texture and mouth feeling due to the acidic denaturation of meat proteins. The lactic acid bacteria (LAB) in starter cultures have been shown to inhibit Staphylococcus, gram-negative bacteria, and E. coli, by 97.8% after 48 hours of fermentation. Further studies of LAB starters (which often contain one or more species) of Pediococcus cerevisiae, Lactobacillus platarum and Staphylococcus carnosus, have shown a very wide spectrum of inhibition activity on Staphylococcus epidermidis, Lysteria monocytogenes Klebsiella oxytoca, Shigella dysenteriae and germination of the spores of Bacillus subtilis and Bacillus cereus, and Pseudomonas fluorescens. I've added extensive coverage to the starter cultures produced by Chr. Hansen, Inc., producers of freeze dried starter cultures on my main web pages [Introduction section - Starter Cultures] BIOPROTECTIVE CULTURES: Listeria is a constant concern in the meat industry. The US-FDA reports (June /29/2009) Listeria monocytogenes (Lm) has been responsible for several outbreaks of food borne illness domestically. Each year approximately 2500 people become seriously ill due to Lm infections. Nearly 500 of these die from their infection. Listeriosis only accounts for about 0.02% of illnesses due to food borne disease, but it causes 27.6% of all deaths due to foodborne infection. Cultures containg Staphlococcus xylosis, Lactobacillus curvatus, and Pediococcus acidilactici provide protection against a population explosion of Lm in fermented sausages. Chr. Hansen North America produces several bioprotective meat cultures; Bactoferm F-LC and the newer Bacterferm BL-C-48. A source for these is listed below EXTERIOR MOLD CULTURES: Many fermented sausages, especially Northern Italian and American-Italian dry salami are generally covered in a pure white mold; much like a good French brie cheese. This is desirable and contributes to the overall taste of the final product. The mold (fungus) is a variety of Penicillium (Penicilium nalgiovense) and is applied to the surface casing after stuffing and tying the salami, prior to fermentation. The easily available product is Bactoferm M-EK-4.
CHOOSING A STARTER CULTURE Consider the qualities you want in your final product. Are you trying to mimic a particular geographic style; German Polish, Italian, etc.? Would you like it to be having a tang [a sharp or acidic] tang or a mild one? What about sweetness? What about salt—with its concentration kill or inhibit the starter culture? And then there is the flavor component—how do you define that quality? Do you consider it divorced from the added spices or in addition to their characteristics? Often it’s a matter of a somewhat educated choice based on experimentation. American style [whatever that means] is generally recognized by a short fermentation that produces a very low pH [high acid content]. These products are mostly produced commercially where a high acid content complies with USDA guidelines and super-fast fermentation gets the product “out the door” and to the consumer quickly. Dry cured sausages from Southern Europe and the Balkans tend to be on the “sweet” side—lower acid [higher pH] and often allowed to dry several months. Rarely will you find Italian, French, Spanish, Serbian salami or Bulgarian Loukaniko to have a tart, acidic tang. On the other hand, fermented sausages from Northern and Eastern Europe generally have a sharp tang [lower pH] whether they are dry-cured or semi-dry-cured [“summer-type” sausage]; Think German Thüringen, Swedish medvurst,
Cultures distributed by Internet online companies are of the freeze dried type. In order to choose the correct culture the following advise may be used as general guidelines. Paragraph numbers refer to the discussion of starter cultures on the INTRODUCTION page.
Technical information sheets provide the recommended temperatures for fermentation, however, bacteria will also ferment at lower temperatures, just more slowly. For example, the technical information sheet for T-SPX lists temperatures as 26-38º C, optimum being 32º C. T-SPX will ferment as well at 20-24º C which is not uncommon for "European" style sausages, and 48 hours or more is not atypical. When freeze-dried cultures are used it is recommended to disperse them in distilled or purified water. Adding 25 grams of powdered culture to 200 kg (440 lbs) of meat makes uniform distribution quite challenging. That comes to about 1/2 teaspoon to 4.5 kg (10 lbs) of meat and the culture must be very uniformly dispersed otherwise defects will occur later on. For those reasons it is advisable, especially at home conditions, to mix 1/2 tsp of culture in 1/2 cup (150 ml) of distilled water and then pour it down all over the meat. Any tap water which is chlorine free will do, the problem is that different cities, or countries, sanitize water in different ways. Chlorine will kill bacteria and the process will suffer. For this reason it is recommended to use distilled water. Mixing freeze-dried cultures with cold water for 15-30 minutes before use allows them to "wake up" and to react with meat and sugar faster when introduced during the mixing process.
Once fast-fermented starter culture or GDL has been added to the sausage mix, the mix should be filled into casings.
I suggest that don't put your trust in indigenous bacteria that contaminate ground meats instead purchase a culture from a supplier, such as Butcher and Packer Company. Use those suggestions in lieu of those given with any formulation or recipe. When you choose a starter, check with the vendor or the manufacture's guidelines as to the required time and temperature for optimum fermentation. Dissolve freeze-dried culture in a couple of tablespoons of de-chlorinated water; add a small pinch of glucose (dextrose) and set aside for 2 or 3 minutes before use.
|
![]()
|
Acids in water separate into ions (Atoms with electron imbalances are called ions), and the positive ion is hydrogen (H+). When hydrochloric acid (HCl) mixes with water, it separates into positive hydrogen (H+) and negative chlorine (Cl-). Hydrogen (H+) combines with water (H2O) to make hydronium (H3O+). Bases in water also separate into ions, and the negative ion is hydroxide (OH-). When the base sodium hydroxide (NaOH) mixes with water, it separates into positive sodium (Na+) and negative hydroxide (OH-). The pH-value indicates the degree of acidity in the meat. Acids all produce Hydrogen ions (H+). Acids like Hydrochloric acid (HCl) produce lots of Hydrogen ions. Chemists write "hydrogen ion concentration" as [H+]. The pH of a solution is expressed mathematically as the negative logarithm of the hydrogen ion [H+] concentration. When producing meat products, the pH-value should lie between 4 to 7; pH- values from 0 to 7 denotes an acidic nature (the smaller the number the more acidic the solution). The neutral point is 7; pH values from 7 to 14 signify alkalinity (the larger the number the more alkaline the solution). When Hydrogen Chloride gas dissolves in water it form Hydrochloric acid and the molecules of Hydrogen Chloride dissociate into Hydrogen ions and Chloride ions.
Water also dissociates to produce ions, this time it is Hydrogen ions and Hydroxyl ions.
Sodium Hydroxide also dissociates to produce ions when it is dissolved in water, this time it is Sodium ions and Hydroxyl ions.
In each case we can measure or calculate the concentration of Hydrogen ions present. In HCl(aq) Hydrochloric acid [H+] = 0.01 In H2O(l) water [H+] = 0.0000001 In NaOH(aq) Sodium Hydroxide solution [H+] = 0.00000000000001 As you can see, these numbers are small and difficult to read and write. By counting the decimal places each of the above can be written as: HCl (aq) pH 2 H2O (l) pH 7 NaOH (aq) pH 14 Though a pH value has no unit, it is not an arbitrary scale; the number arises from a definition based on the activity of hydrogen ions in the solution. The formula for calculating pH is: pH = -log10 [H+]
Log10 denotes the base-10 logarithm, and pH therefore defines a logarithmic scale of acidity. A lower pH value (for example pH 3) indicates increasing strength of acidity, and a higher pH value (for example pH 11) indicates increasing strength of alkalinity.
For a more scholarly discussion of pH see: How to Determine pH or The Wikipedia Definition
Meat with a low pH-value (pH-value below 5.8) has a poor water binding capacity. This means high cooking losses, inconsistent weight and a dry, straw-like consistency. For this reason water-bonding chemicals, like sodium polyphosphates, are generally added to the formulation. It's use is optional, however. Other additives contribute to good curing features, such as accelerators like ascorbate or erythorbate, that are used for good color development and color stability. These accelerators act as reducing agents and/or lower the pH to provide the environment required to enhance the rate of conversion of nitrite to nitric oxide, which reacts with myoglobin plus heat to yield nitrosylhemochrome (pink). The reduction of microorganism growth by the addition of nitrite results in a longer shelf-life and a longer storability of the meat and meat products.
he most accurate way to test pH in dryed
sausage or salami is to use a pH meter with a specially designed probe for
"jabbing" into the meat product. They are prohibitively expensive for the
average hobbist, but essential in commercial plants. Cole Palmer sells an
expensive but a good one- Some common pH values founding sausage making and meat production are: 6.4 Injection brines 5.8 to 6.2 Pork muscle 5.5 to 5.8 Beef muscle 4.8 to 5.5 Dry-cure sausage
|
|
Spices come from the bark, root, flower buds, seeds, berry, or the fruit of tropical plants and trees. Herbs are leaves of shrubs and can be used fresh or dried. Seasonings are generally dehydrated vegetables include onion powder or flakes, garlic powder or granules, sweet peppers, chili peppers, mints, and freeze-dried chives, onions and shallots whereas seasoning blends are mixtures of spices and herbs. When formulating your own sausage recipes use the strong, pungent spices, herbs and seasonings such as chili peppers or rosemary in small amounts. Aim for more delicate seasoning which can be used in greater amounts without ruining the final product. Remember that the herbs or spices should enhance and not overpower the flavor of the meat. The art of using herbs and spices in sausage making is learning how much to add and how to combine flavors. More than one herb or spice can be used in a formulation. Start with a tested recipe then decide if more or less seasoning is needed to suit your taste. It is generally recommended to begin with about 1½% total weight of spice per weight of meat used (about 1/4 teaspoon of spice per pound of meat) when developing recipes. Stronger seasoning like chili should begin with ½ that amount; is easier to add more than to try to compensate for too much. As you gain experience in combining herbs and spices, taste will tell if others might be added to your formulation. It is absolutely essential that you use fresh spices for consistent results. If your ground spices are more than 6 months old, through them out and purchase new ones. It is always better to purchase whole, un-ground spices and grind them yourself as needed...you'll be surprised by the difference! The most consistent results are obtained by accurate weighing of both the meats and the spices. Keep your whole spices covered in air-tight tins to prevent the loss of volatile oils. Place the date of purchase on the tin! Whole spice should be renewed after two years. For those of you that are considering making this a hobby, I recommend that you purchase a good coffee mill to dedicate as a spice grinder. The quality your are looking for is a removable, stainless steel grinding cup. Plastic and other material retain the spice oils and are difficult to clean. Also purchase TWO good electronic scales: One dedicated to measuring spices, that will measure in 1/10 of a gram with a load limit of 454 gram (1 lb.); The other dedicated to meats should measure in grams up to 5 or 10 Kilograms (11 to 22 lbs).
Dry Spices - Weights are in grams |
||||||||||||||||||||||||||||||||||||||||||||||||||||||||||||||||||||||||||||||||||||||||||||||||||||||||||||||||||||||||||||||||||||||||||||||||||||||||||||||||||||||||||||||||||||||||||||||||||||||||||||||||||||||||||||||||||||||||||||||||||||||||||||||||||||||||||||||||||||||||||||||||||||||||||||||||||||||||||||||||||||||||||||||||||||||||||||||||||||||||||||||||||||||||||||||||||||||||||||||||||||||||||||||||||||||||||||||||||||
|
![]()
|
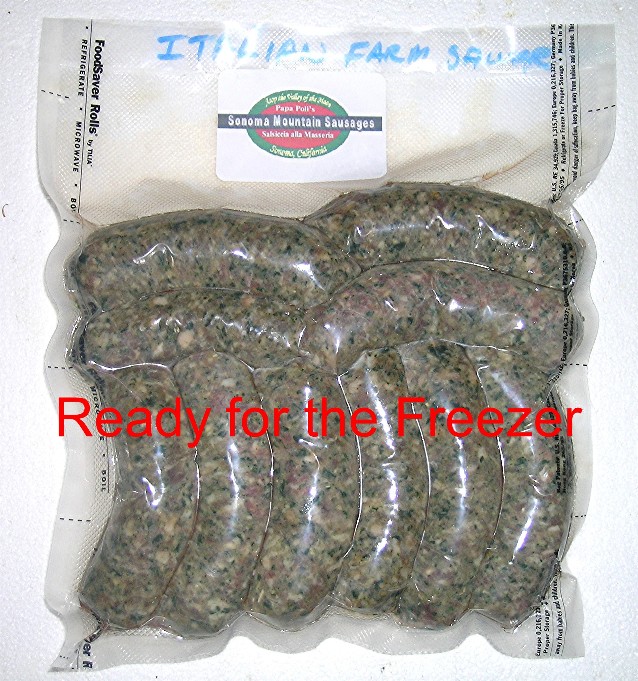
Dry cured sausages do not need to be refrigerated if keep in a cool, dry place. Of course, if summer temperatures are very high, it's best to refrigerate them or keep them in a cooler so the fat does not render out. Some Italian cultures preserve their dry cured sausages under oil or lard. They may be kept for more than a year this way. Smoked sausages that are then air-dried may also be kept for a short period out of the refrigerator...again use your judgment in relation to the air temperature. They maybe well packed and frozen, if you wish. Cooked and Smoke-cooked sausages should always be kept under refrigeration. Well packaged, they will keep for approximately 2 weeks under refrigeration or else they should be well packed and frozen. Fresh sausages should be consumed within 3-5 days or else they should be well packed and frozen.
|
|
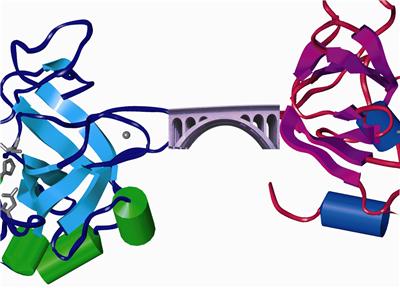
TRANSGULATAMINASE - PROTEIN CROSS LINKING ENZYME Introduction: This is an enzyme needed and used in living animals to repair lesions of body tissues and create stable structures by extensively cross-linking protein molecules. It has the capacity to form bonds between surface protein structures of individual small or large muscle masses. This effect can be used to create protein network structures in raw and cooked meat products. The enzyme could be used to reduce or completely substitute for the use of phosphates and other binding substances in raw-cooked or cured-cooked products. When used in raw-fermented sausages, which are a mix of chopped meat and fat particles, transglutaminase causes a firm cohesion of these particles during aging process. Ever eat chicken nuggets or commercial hot dogs? Have you heard of "meat glue"? Commercial deli meat producers have been using it for years. Ever notice the deli hams that are evenly textured, or the large sliced turkey breasts with no sinew, or those "canned hams" that don't look like any ham muscle you've seen before? Well it's because they used a naturally produced enzyme called transglutaminase to "glue" meat trim or emulsion together. This enzymes causes the proteins (well, certain protein amino acids) in muscles to cross-link---in layman's terms, stick together by a chemical reaction. Basically it restructures the meat muscle into a single unit! For example, you can get two pork tenderloins (that taper) , sprinkle some enzyme, and line them up to form an uniform roll! It's not a quick reaction, but takes at least 6 hours (or better up to 24 hours) to completely bond and it should be done under refrigeration. The enzyme is either sprinkled over the chunks of meat or dissolved in water and painted on; then the meats are formed as desired in the final product and placed under a vacuum ( a "Food -Saver" bag will work). After bonding the meat (sausage or whatever) can be cooked or smoked as per the recipe you are using. It is produced by Ajinomoto (the people that make "Accent" and is sold under the trade name "ACTIVA-RM".
Some Chemistry: Cross-links are small chemical bridges that interact with specific regions of a protein and as a result are able to form a strong chemical bond between proteins in close proximity to each other. In ACTIVA, the enzyme is a relative small enzyme with 331 amino acids that are twisted and folded around the amino acid cysteine into an active bio-molecule. The enzyme targets the glutamine and lysine amino acid in protein muscles. There are huge amounts of these amino acids and the enzyme will stitch tem together form a very strong chemical bond. (a covalent bond-if you remember your high-school chemistry)
Cross-linking reaction of transglutaminase. The enzyme facilitates the formation of a covalent bond between the carboxyl group (COOH) of a glutamine residue in one protein and a amino group (NH2) in a second protein, joining the two proteins and releasing ammonia (NH3).
The enzyme works best in the pH5 to pH7 range, but remains functional throughout the pH4 through pH9 range. It is inactivated by temperature over 149oF. Transglutaminase is reactive with several proteins found in muscle.*
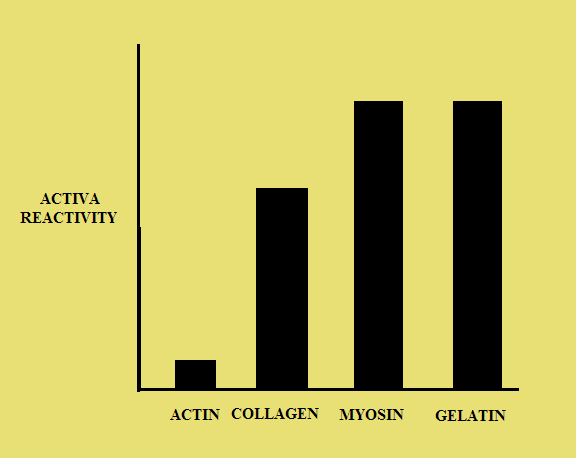
Application*: The major application for sausage makers is the restructuring of muscle meat and the economical use of trim. Whole muscles can be joined, as in the case of forming tapering tenderloins into rolls; layering thinner cuts of meat joining flaked products, improve the slice-ability in muscles with weak seams; wrapping dissimilar cuts, such as bacon around solid muscle; etc. Muscle protein with large amounts of myosin (dark red color) work best.
Generally the application of enzyme should be between 0.75% - 1.0% of the formula weight. It may be applied as follows:
· Sprinkle Method: The enzyme can be sprinkled directly on the meat surface. The pieces are then joined and placed in vacuum or pressure mold. · Dry addition to previously marinated meats: After coating marinated muscle, muscles are joined molder or formed and refrigerated until sufficiently bonded. Working time is 20-30 minutes after adding ACTIVA. · Slurry Method: ACTIVA is hydrated at 4 -4.5 times its weight in pure water and painted or added to meat chunks, blended well and product formed within 20-30 minutes, then refrigerated. Generally use 1.0% of the formula weight. * source ACTIVA General Information. Ajinomoto Food Ingredients, LLC
|
|
MONOSODIUM GLUTAMATE (MSG) -- Questions and Answers --
WHAT IS MSG?--Monosodium glutamate (MSG) is the sodium salt of the common amino acid glutamic acid. Glutamic acid is naturally present in our bodies, and in many foods and food additives. HOW IS IT MADE?--MSG occurs naturally in many foods, such as tomatoes and cheeses. People around the world have eaten glutamate-rich foods throughout history. For example, a historical dish in the Asian community is a glutamate-rich seaweed broth. In 1908, a Japanese professor named Kikunae Ikeda was able to extract glutamate from this broth and determined that glutamate provided the savory taste to the soup. Professor Ikeda then filed a patent to produce MSG and commercial production started the following year. Today, instead of extracting and crystallizing MSG from seaweed broth, MSG is produced by the fermentation of starch, sugar beets, sugar cane or molasses. This fermentation process is similar to that used to make yogurt, vinegar and wine. IS MSG SAFE TO EAT?--FDA considers the addition of MSG to foods to be “generally recognized as safe” (GRAS). Although many people identify themselves as sensitive to MSG, in studies with such individuals given MSG or a placebo, scientists have not been able to consistently trigger reactions. DOES “GLUTAMATE” IN A PRODUCT MEAN IT CONTAINS GLUTEN?--No—glutamate or glutamic acid have nothing to do with gluten. A person with Celiac disease may react to the wheat that may be present in soy sauce, but not to the MSG in the product. WHAT’S THE DIFFERENCE BETWEEN MSG AND GLUTAMATE IN FOOD?--The glutamate in MSG is chemically indistinguishable from glutamate present in food proteins. Our bodies ultimately metabolize both sources of glutamate in the same way. An average adult consumes approximately 13 grams of glutamate each day from the protein in food, while intake of added MSG is estimates at around 0.55 grams per day. HOW CAN I KNOW IF THERE IS MSG IN MY FOOD?--FDA requires that foods containing added MSG list it in the ingredient panel on the packaging as monosodium glutamate. However, MSG occurs naturally in ingredients such as hydrolyzed vegetable protein, autolyzed yeast, hydrolyzed yeast, yeast extract, soy extracts, and protein isolate, as well as in tomatoes and cheeses. While FDA requires that these products be listed on the ingredient panel, the agency does not require the label to also specify that they naturally contain MSG. However, foods with any ingredient that naturally contains MSG cannot claim “No MSG” or “No added MSG” on their packaging. MSG also cannot be listed as “spices and flavoring.” HAS FDA RECEIVED ANY ADVERSE EVENT REPORTS ASSOCIATED WITH MSG?--Over the years, FDA has received reports of symptoms such as headache and nausea after eating foods containing MSG. However, we were never able to confirm that the MSG caused the reported effects. These adverse event reports helped trigger FDA to ask the independent scientific group Federation of American Societies for Experimental Biology (FASEB) to examine the safety of MSG in the 1990s. FASEB’s report concluded that MSG is safe. The FASEB report identified some short-term, transient, and generally mild symptoms, such as headache, numbness, flushing, tingling, palpitations, and drowsiness that may occur in some sensitive individuals who consume 3 grams or more of MSG without food. However, a typical serving of a food with added MSG contains less than 0.5 grams of MSG. Consuming more than 3 grams of MSG without food at one time is unlikely.
Are MSG and hydrolyzed protein related?--Yes. MSG is the sodium salt of glutamic acid. Glutamic
acid is an amino acid, one of the building blocks of protein. It is found in
virtually all food and, in abundance, in food that is high in protein,
including meat, poultry, cheeses, and fish.
Source:
U.S. Food and Drug Administration November 19, 2012
|

![]()
![]()
Home | Introduction | Making Salami | Formulations | Resources | Production Photos | Tips

.JPG)
.JPG)
.JPG)
.JPG)

 paste such as is found in
hot dogs, bologna, liverwurst, mortadella, etc.
paste such as is found in
hot dogs, bologna, liverwurst, mortadella, etc.